Welcome to this years seventh week of Dynamics GP New Feature Blog series, where we will showcase the top features requested by Microsoft customers and partners. Let’s get started!
Feature 24 – Payroll option in Build window to not include additional withholding
You asked, and we listened! Due to high Partner/Customer demand, with this release of Microsoft Dynamics GP, users can now specify whether “Additional Taxes” are included or excluded in a Payroll build via the Build Payroll Checks window.
To exclude a specific “Additional Tax” from a specific payroll build, users can simply “unmark” the box next to the appropriate additional tax type in Build Payroll Checks window.

In prior versions of Microsoft Dynamics GP, users did not have the ability to include or exclude Additional Tax in the Build Payroll Checks window. Additional Tax Withholding amounts were automatically included and calculated as part of the normal payroll process.
Additional Tax Withholding amounts are assigned in the following windows:
|
Tax |
Window |
Field |
|
Federal Tax |
Employee Tax Maintenance window |
Additional Withholding |
|
State Tax |
Employee State Tax Maintenance window |
Additional State Withholding |
|
Local Tax |
Employee Local Tax Maintenance window |
Additional Withholding |
Federal, State, and Local Check Boxes have been added to the Build Payroll Checks window to accommodate the new “Include/Exclude Additional Tax from the Payroll Build” functionality:
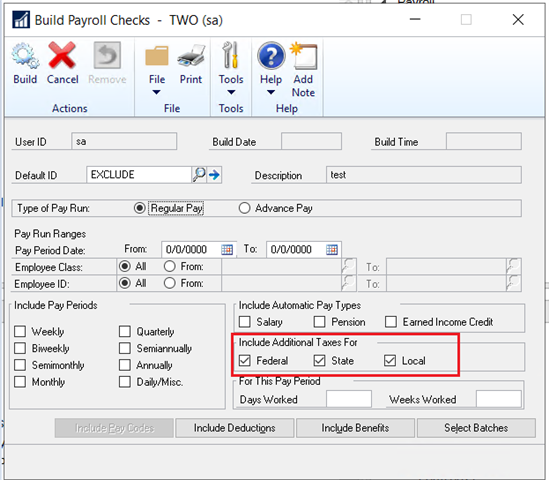
By default, boxes are marked to “Include Additional Taxes For” Federal, State, and Local tax in the Build Payroll Checks window.
To ‘exclude’ a specific ‘Additional Tax” from a specific Payroll Build, simply “unmark” the box next to the “Additional Tax” type that should not be included in the build.
Three new fields were added to the UPR10200 and UPR10210 tables to accommodate the new “Include/Exclude Additional Tax from the Payroll Build” functionality:
|
Table Name |
Federal Additional Tax Field |
State Additional Tax Field |
Local Additional Tax Field |
|
UPR10200 |
PayRunIncAddlFedTax |
PayRunIncAddStateTax |
PayRunIncAddStateTax |
|
UPR10201 |
PayRunIncAddlFedTax |
PayRunIncAddStateTax |
PayRunIncAddStateTax |
|
1 = Include Additional Tax, 0 = Exclude Additional Tax |
|||
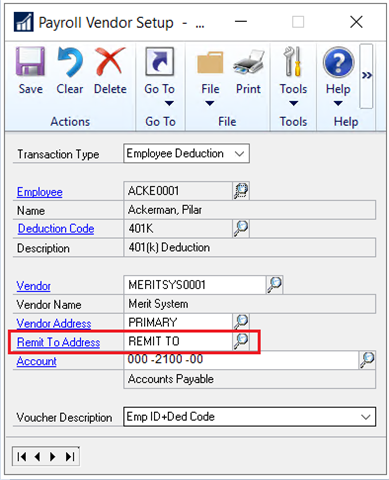
Feature 25 – PIP – Remit to Address in Payroll Vendor Setup
With this release of Microsoft Dynamics GP, users can now specify a vendor Remit to Address in the Payroll Vendor Setup window. This feature will be beneficial to use in conjunction with Vendors that have multiple “Remit to” addresses that are used on a regular basis.
For example, maybe your company has multiple garnishments assigned to multiple employees, all of which need to be sent to the same Courthouse vendor. The Courthouse vendor has multiple Remit to Addresses (ex: Courthouse1, Courthouse2, Courthouse3, etc.). Our new feature allows users to specify ‘which’ Courthouse address should be associated with each individual garnishment to ensure those funds are sent to the right place!
The “Remit to Address” field in the Vendor Setup window will be the “Remit to Address” used on the voucher created in Payables Management.
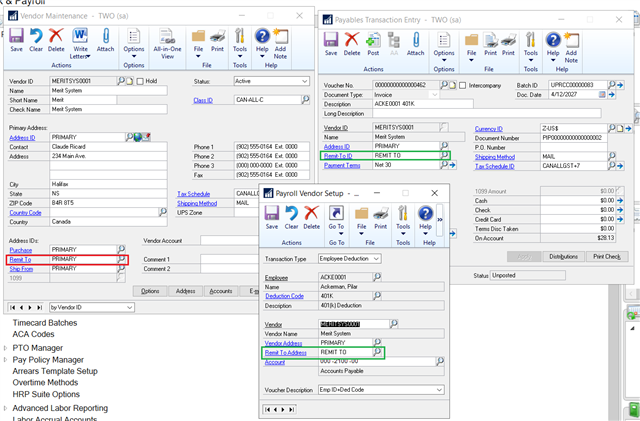
In prior versions of Microsoft Dynamics GP, the “Remit to” Address Id on the Payables voucher is pulled from the “Remit to” Address Id field in the Vendor Maintenance window.
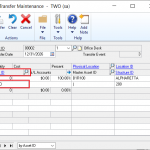
The “Remit To Address” field was added underneath the Vendor Address field in the Payroll Vendor Setup window:
 The VADCDTRO column was added to the APR_PIP40100 table (APR Payroll Vendors) to accommodate the new Remit To Address functionality:

Feature 26 – PIP Voucher Report and Payables Voucher Edit List Report
With this release of Microsoft Dynamics GP, users can print the Payroll Integration to Payables Voucher Edit list, as well as the Payables Voucher report as part of a payroll computer check pay run.
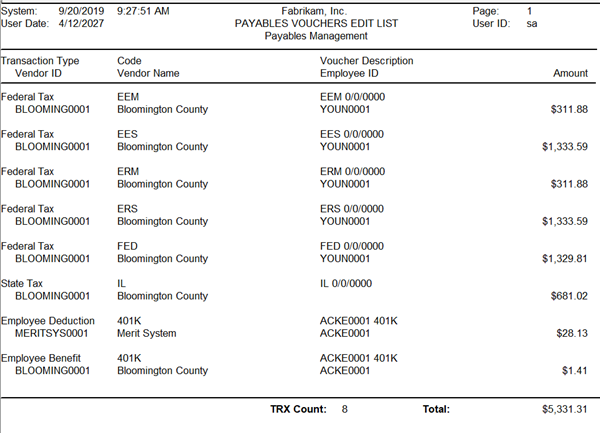
The Payables Voucher Edit List report allows users to gain visibility into what vouchers will be created payables prior to posting the pay run. The Payables Voucher Edit is printed after the Precheck Report (aka Calculate Checks report), and prior to when checks are printed. The main advantage is that this report is available BEFORE the posting process, allowing users visibility into what is going to happen prior to posting.
The Payables Voucher report allows users to see the voucher numbers created in payables upon posting the pay run. The Payables Voucher report is the last journal printed as part of the payroll posting process.
In prior versions of Microsoft Dynamics GP, users did not have the ability to review the vouchers to be created in Payables prior to posting a pay run. Additionally, no Payables Voucher report was printed as part of the posting process.
The Posting Setup window to accommodate the new “Payroll Integration to Payables Voucher Edit List report” functionality:
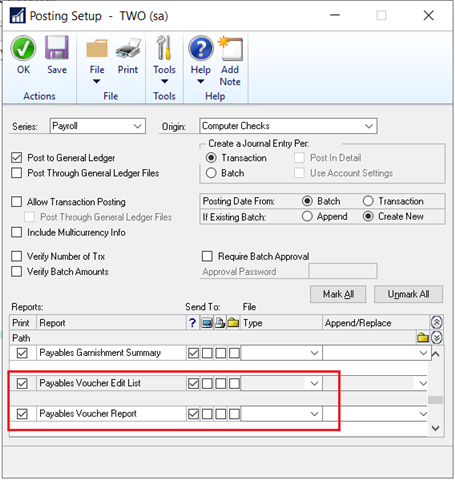
To print the Payables Voucher Edit List report, mark the Print box next to Payables Voucher Edit List, select an appropriate destination (Always Ask, Screen, Printer, File), and click Save in the Posting Setup window when the Payroll Series, and Computer Check Origin are selected.
To print the Payables Voucher report, mark the Print box next to Payables Voucher Report, select an appropriate destination (Always Ask, Screen, Printer, File), and click Save in the Posting Setup window when the Payroll Series, and Computer Check Origin are selected.
The Payables Voucher Edit List Report has been created accommodate the new “Payroll Integration to Payables Voucher Edit List report” functionality. This report will display the Transaction Type, Transaction Code, Voucher Description, Vendor ID, Vendor Name, Employee ID (where appropriate), and the Amount of the voucher that will be created in Payables Management:
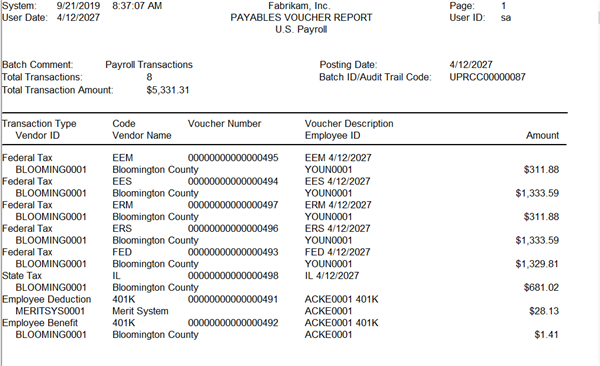
 The Payables Voucher Report has been created accommodate this new functionality. This report displays the Transaction Type, Transaction Code, Voucher Number, Voucher Description, Vendor ID, Vendor Name, Employee ID (where appropriate), and the Amount of the voucher that was created in Payables Management:
Feature 27 – Deduction/Benefit Quick Assignment functionality
With this release of Microsoft Dynamics GP, users can now assign benefit and/or deduction codes to employees in mass at the Payroll/Human Resources Setup level.
Quick assignments are only accessible via GoTo menus which are available on each of the benefit/deduction code setup windows in Human Resources and Payroll. This allows users to create or modify a code and then immediately assign it to one or more employees quickly.
When the Quick Assignment window is opened from a setup record, it will default in the code that is currently being displayed in its parent window.
Users can change the “Code Type” and/or the “Code” in the Quick Assignment window to quickly assign additional codes to one or more employees without having to first open the corresponding setup window.
Quick Assignment GoTo Menus can be accessed via following windows:
|
Window |
Module |
|
Deduction Setup window |
Payroll |
|
Benefit Setup window |
Payroll |
|
Miscellaneous Benefit Setup window |
Human Resources |
|
Health Insurance Setup window |
Human Resources |
|
Life Insurance Setup |
Human Resources |
|
Retirement Plan Setup |
Human Resources |
Important Note: “Payroll View for Human Resources” must be marked in the User Setup window to access the Quick Assignment window via the Human Resources Benefit/Deduction Setup windows.
When benefit/deduction codes are assigned via the Quick Code Assignment window, Microsoft Dynamics GP creates the corresponding maintenance records in Payroll and/or enrollment records in Human Resources for the employee.
When Human Resources codes are being assigned, dependent on the settings, Microsoft Dynamics GP will automatically create or prompt the user to create the corresponding benefit and deduction records in Payroll.
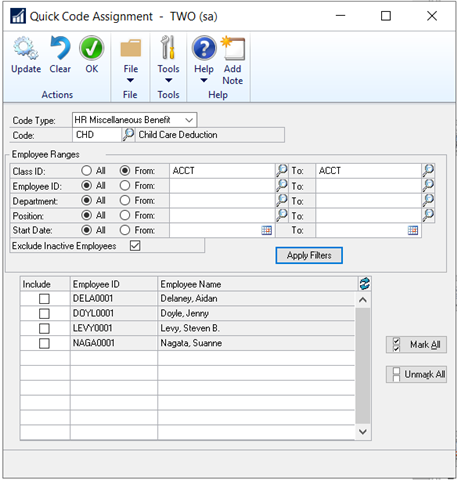
The Quick Code Assignment window has been added to accommodate the new “Deduction and Benefit Quick Assignment” functionality. To open the Quick Code Assignment window: On the Microsoft Dynamics GP menu, highlight Tools, select Setup, point to one of the Payroll or Human Resources Benefit or Deduction Setup windows, and click on GoTo Quick Code Assignment:
The following Code Types are available in the Quick Code Assignment window:
|
Payroll Deduction |
|
Payroll Benefit |
|
HR Retirement |
|
HR Life Insurance |
|
HR Miscellaneous Benefit |
|
HR Health Insurance |
To quickly assign a deduction/benefit code to one or more employees in the Quick Assignment window:
1. Select an appropriate Code Type.
2. Assign an appropriate Code.
3. Restrict employees by Class ID, Employee ID, Department, Position, and Start Date to control which employees are displayed in the bottom half of the window.
4. If desired, mark the box next to ‘Exclude Inactive Employees’ to exclude inactive employees from being shown.
5. Click on the Apply Filter button to see all employees that meet the restriction criteria.
6. Mark the box next to ‘Include’ for all employees for whom the code should be created/modified. Use the ‘Mark All’ and/or ‘Unmark All’ buttons to quickly mark or unmark the ‘Include’ box next to all employees.
7. Click on the ‘Process’ button to create/modify appropriate Payroll/Human Resourced Deduction/Benefit Records.
And that wraps it up for this years week 7 of Microsoft GP New Feature blog series. For more information/documentation on new features please check out Microsoft Dynamics GP New Feature Blog Series!
Contact us to learn more about our commitment to help customers implement their financial and business management systems. Team up with a certified, Microsoft Gold Partner to make your migration to the cloud seamless. Or if you have any questions regarding Dynamics 365 or other ERP/CRM systems, you can contact us here.
Don’t forget to follow us on Facebook, LinkedIn, and Twitter. Subscribe to our YouTube channel for insightful tutorials and demos.