
How to connect to your Dynamics 365 Business Central Docker sandbox database with SQL Server Management Studio or Visual Studio Code?
Getting started with local container sandboxes for Business Central is very easy. Just download and install Docker locally (remember to choose Windows containers), install the NAV Container Helper Powershell module.
- Install: module navcontainerhelper -force
- Run:
New-NavContainer -accept_eula -imageName microsoft/bcsandbox:us -containerName -auth NavUserPassword -updateHosts -usebestcontaineros
(you will be prompted for the username/password that you want to use for the sandbox).
Now you can connect to the sandbox from Visual Studio Code and start developing in AL. But what if you want to peek into the database inside the container? Well, this is not that difficult if you know a few SQL Server and Docker tricks…
The commandlet New-NavContainer will place two shortcuts on your desktop to help connect to the container: Command Prompt and Powershell Prompt. If you still have them, skip the step below on how to connect and go to the paragraph about sqlcmd. If not, then you need to find the container ID for your sandbox. In an elevated Powershell prompt, type
docker ps
This shows information about all running docker containers:
CONTAINER ID IMAGE COMMAND CREATED STATUS PORTS NAMES 8e0967a5b798 microsoft/dynamics-nav:generic-1803 "powershell -Command…" 7 days ago Up 7 days (healthy) 80/tcp, 443/tcp, 1433/tcp, 7045-7049/tcp, 8080/tcp
In this example, the container ID is 8e0967a5b798.
From the same Powershell prompt type
docker exec -it 8e0967a5b798 powershell
This opens a new Powershell prompt where you are now connected to the container.
In the new prompt type
sqlcmd
to start the SQL Server commandline utility. Now you are connected to the default SQL Server instance in your sandbox. You can test that this is indeed the case by querying for the databases inside the instance:
1> select name from sys.databases 2> go name -------------------------- master tempdb model msdb CRONUS (5 rows affected)
Notice that the command prompt tool sqlcmd requires you to end all T-SQL commands with the GO keyword.
Running New-NavContainer with the -auth NavUserPassword switch actually creates a SQL Server user with the same username and password as you specify for Business Central. But you can also use T-SQL to create a user that can be used to connect to the database from your host OS:
1> CREATE LOGIN WITH PASSWORD = 'WRITE PASSWORD HERE'; 2> GO 1> CREATE USER FOR LOGIN ; 2> GO
Finally, you need to grant the new user read access to the Business Central database:
1> use CRONUS 2> GO Changed database context to 'CRONUS'. 2> ALTER ROLE db_datareader ADD MEMBER 3> GO
And that should be it. Let’s test if it works…
If you ran New-NavContainer with the -updatehosts switch, the Docker will add a hosts file entry mapping the host name to the IP address on your OS. You can check for yourself by inspecting your hosts file
C:>more c:WindowsSystem32driversetchosts 192.168.1.240 host.docker.internal 192.168.1.240 gateway.docker.internal 172.25.63.140 kennietest
(in my example, the container is called kennietest).
Or you can ping your container:
C:>ping kennietest Pinging kennietest [172.25.63.140] with 32 bytes of data: Reply from 172.25.63.140: bytes=32 time<1ms TTL=128
If you didn’t use the -updatehosts switch, then use the docker inspect command to get the IP address:
docker inspect
You can filter away everything else that the IP address with this filter:
docker inspect -f '{{range .NetworkSettings.Networks}}{{.IPAddress}}{{end}}'
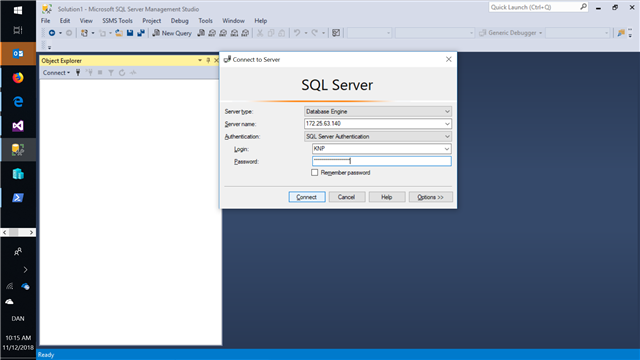
Open SQL Server Management Studio and connect, either with the host name or with the IP address of the container:
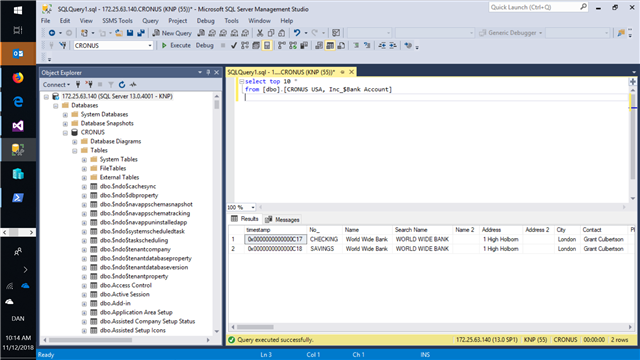
and check if you can access the Business Central tables
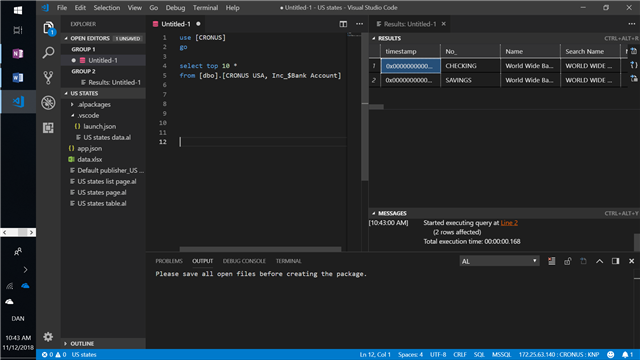
You can also use Visual Studio Code to connect to the database using the mssql extension (see link below on how to set this up).
The next FAQ is about How to avoid search timeout? Seek and you shall find!
If you want to try this but don’t yet have a Business Central trial, that’s an easy fix. Just contact us!
Re-posted from Microsoft | Dynamics 365 Business Central Blog
Related posts:
 D365 BC F.A.Q. 5 | Find the right resources and provide feedback for Dynamics 365 BC!
 Microsoft Dynamics NAV Azure Takes SQL Server to the Cloud; Web Client Enhances Productivity
 D365 BC F.A.Q. 1 | How to End a fiscal year in Dynamics 365 Business Central?
 D365 BC F.A.Q. 7 | How to Manage Your Dynamics 365 Business Central Client Environments